com.homemade.utils.audio-clip-adjuster
info
Version: 1.0.0
Github: Link
This is simple package for adjust audio clip in Unity, can use in any project. An extension for Unity that calls into FFmpeg to adjust audio clips quickly.
1. Import
Download from my registries
- Open Package Manager in Unity.
- Select Packages tab: My Registries.
- Download package: com.homemade.utils.audio-clip-adjuster
Follow the setup: Click here.
Import from github
- Link github: Link package
- Open Package Manager in Unity
Follow this guide: Click here.
2. Introduction
Features
- Change the volume of an audio clip with the click of a button. No need to open Audacity!
- Change the pitch or tempo at the same time, if you'd like.
- Select multiple clips in Unity to edit them as a batch.
- Keeps the original clip in the Temp folder so it can be restored (as long as you don't close Unity).
Requirements
You must have FFmpeg installed. It is a command line tool for converting and editing audio / video.
Link download FFmpeg: Click here
Link how to install FFmpeg: Click here
3. Installation
- Run ffmpeg in the command line to see if it's already installed.
- If not, download and unpack FFmpeg to your system.
- Ideally, add FFmpeg to your PATH. If you skip this step, you'll have to manually point to FFmpeg in the Audio Clip Adjuster settings.
note
Where to type in the FFmpeg path.

4. How to use
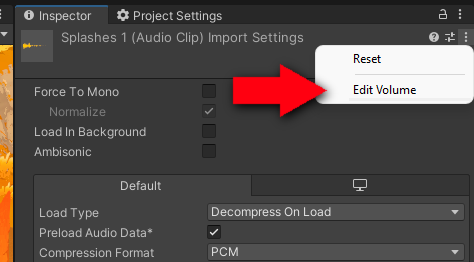
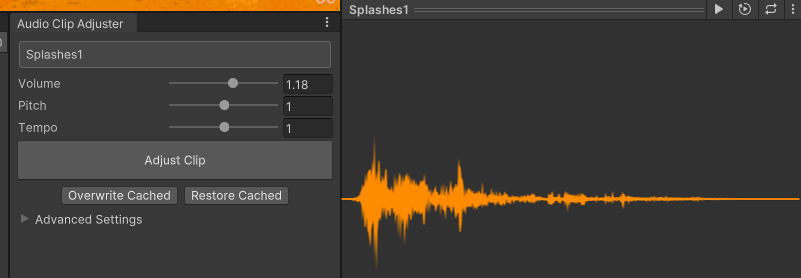
- To open the Audio Clip Adjuster window, select an audio clip.
- In the inspector open the audio clip context menu (by clicking the three dots icon) and select "Edit Volume."
- Adjust the parameters and press "Adjust Clip" to modify the audio clip asset.
- Press "Restore Cached" to revert the clip to its original form. This option is only available until you close Unity.
- Press "Overwrite Cached" to destroy the original clip and apply these changes permanently. If you want to increase the volume above 200% you'll need to do this.